Are you tired of having to walk through mud in order to get your daily newspaper? Then it might be the time for you to create a brick path. It will only take you a couple of days to complete, and you can even take it as a weekend DIY project. Afterwards, you’ll have a durable walkway that’ll keep your shoes clean while enhancing your landscaping.
With a brick path, you’ll no longer have to wear waders in order to get the mail in your letterbox, and as long as you carefully follow the recommended steps below, you can rest assured that your new pathway will be able to endure all types of weather conditions.
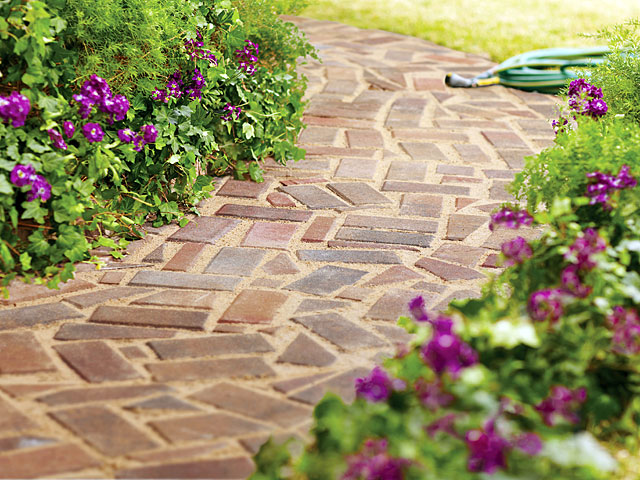
Choose Your Brick
The first step you should take when building your brick path is to make sure that you have the right type of brick.
Type: SW rated bricks come highly recommended when building an outdoor pathway, because they’re able to withstand extreme weather conditions and traffic with ease.
Size: These days, most prefabricated bricks are usually 8 x 4 inches, whereas a well-made pathway should measure 3 and 4 feet wide. You may also opt for standard bricks, which although outdated, are tighter at ¼ inch longer.
Shape: In terms of shape, you can either go for what’s known as a ‘sailor course’ or a ‘soldier course’. Sailor course bricks are placed on short ends and are linked together by the edges, whereas soldier course bricks are linked by their fronts almost like dominoes. The latter is a good option because you can completely submerge them for maximum support.
When building a walkway, it also helps to make sure that it’s at least 3 feet away from trees that have widespread roots.
Excavate the Soil
After you’ve figured out how wide you want your walkway to be, add about 2 inches to that measurement and then use a rope to draw out the path according to these dimensions. Excavate the soil in between the rope marks where your pathway will be, and keep going until the soil color changes. This means that you’ve dug out the entire top layer of soil, which should be placed on a tarp in the meantime.
Fill with Graded Base
For proper drainage, you’ll have to fill the excavated area with a base layer comprised of stoned dust and crushed stone mixed together. Compress the first layer by hand or by using a plate compressor, which you can rent at $80 per day. Add yet another layer of the same mixture until you get to 3 ½ inches below grade.
Top the mixture with a layer of sand, and then spray some water on the base to make sure that it’s properly compressed.
Add Sand Layer
Cut a 2×4 with a handsaw and make sure that it’s an extra 6 inches more than the total width of your path and the same height as a flat brick, and then carve notches on the edges of each of them.
Dig a few narrow troughs right beside the ends of the graded base you just compressed, and make sure that it will be able to fit composite lumbers that are 1×4 long and wide. Flank the walkway with the 1x4s and attach them together with serrated screed. Smack the 1x4s with a dead-blow mallet so that they’re flush with the graded layer.
Grade the Path
Get a 1/8 inch scrap of wood and attach it to the end of a 4-foot level using some tape. Lay the level diagonally on the two rails and knock it into the ground. Fill the cavities between the rails with 2 inches of Denver landscaping sand and compress it in, and then smooth it out.
Lay the Brick Edging
Score out 2 ½ inch deep trenches alongside the guide rails, place a brick on either end and pound it level with a dead-blow mallet. Set the bricks alongside the edges so that they’re flanking the path.
Fill in the Field
Screed the sand and press a brick alongside the other brick along the edge, and make sure that it’s flush with the beginning of the path. Smack your brick until it’s in level with the edge of the pathway. Follow the same process to lay the rest of the bricks and examine the slope of the bricks as you go along using a scrap-wood attachment.
Fill the Joints
Top the bricks with a thin layer of landscape design Denver sand and sweep it into the intersection between the bricks by using a large push broom. Then, sprinkle some water with your hose to dampen the path, and then cram wet sand into the cracks until it comes to the surface.
Leave the sand untouched for about a week and if there are still joints after that, top them up with some more sand. As you can see, you don’t necessarily have to be a landscaping Denver expert in order to make your own pathway. All you need is some know-how and the right tools to create a pathway that is strong, long-lasting and aesthetically pleasing.